Naturally Dyed Easter Eggs

This is our first Easter in our farmhouse and I wish I was sharing some freshly gathered eggs from our laying hens, but we currently only keep bees here at Tuckamore!

My friend’s father (we’ll call him Shay) has a small farm with horses, chickens, turkeys, and other farm animals in our area. Lloyd’s been drawing on Shay’s depth of knowledge and has been trying to convince me that, like Shay, we absolutely need some guinea hens. I’m open to welcoming most animals here but not entirely sure about the guinea just yet. After meeting (and hearing one) in person, I don’t think our neighbours would be too enthused, either.

I do, however, hope to someday have chickens and ducks along with their beautiful eggs to collect, share, and display around the farmstead. The next best thing for this year are the various hues created by naturally dying Easter eggs.

Holidays are the perfect time to bring in hand made crafts and ornaments that can show as classic decor pieces and become some of our favourite family traditions to take part in each year.
This year, especially, these traditions offer a sense of steadfast comfort and warmth during otherwise uncertain times.
If you have a little at home from school, this activity can also serve as a real life science experiment. With my elementary school teacher background, I couldn’t help but think of the potential for learning while dying our own eggs.
Children can talk about, write down, or sketch out their predictions for what will happen, the materials and methods they use, results, and discussion; The Scientific Method. They could also connect with friends or family members online to egg dye together and compare results.

It was easier than I had thought it would be and once I tried a few different ingredients, I felt more confident to experiment. Here’s what I used to create our non-toxic, naturally dyed eggs.
Materials:
12 eggs
Measuring cup and teaspoon
4 different containers to dye eggs in (I used mason jars and a glass mug I had on hand)
1 fine mesh sieve
a small pot or pan, no cover (I used the same pot, rinsed out each time)
vinegar
1 cup spinach
1 cup red cabbage
1 cup blue berries
1 cup (packed) red onion skins
water for boiling
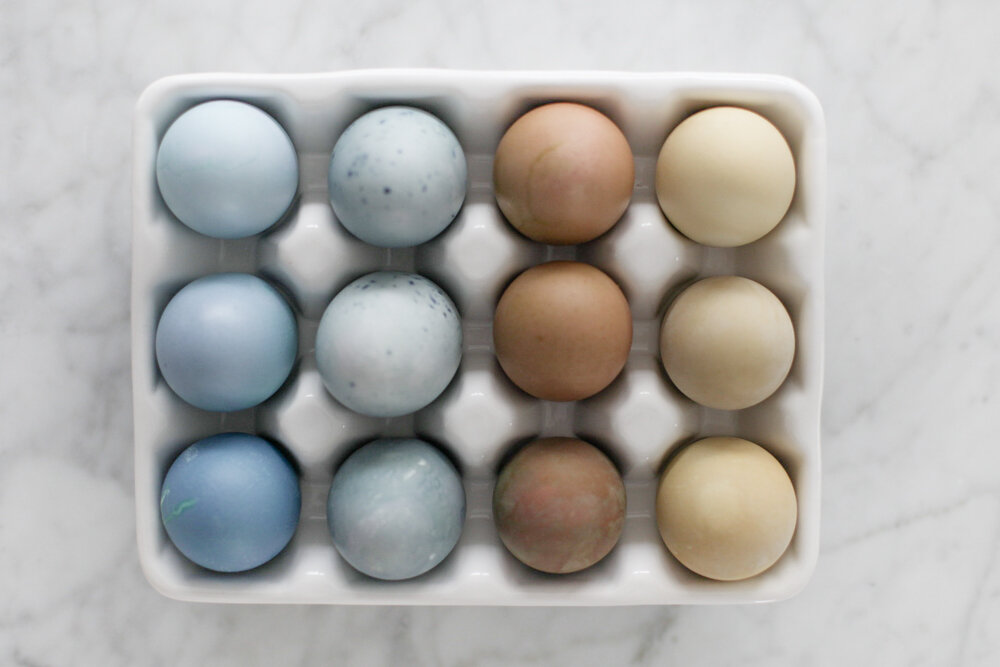
Red cabbage (blue) , blue berries (speckled blue), red onion skins (brown with green marking), spinach (light brown/green)
How To Naturally Dye Easter Eggs:
Colouring:
Blue-red cabbage
Blue (speckled)-blue berries
brown-red onion skins
Light green-spinach
Boil eggs and let cool.
I put room temperature eggs into a pot and gently cover with cold water. Bring to a boil, turn off heat, and then let sit until the water is cool to touch (it can take up to a few hours).
Gather the different items you would like to try as a colorant (i.e., spinach, etc.).
Measure out at least 1 cup each.
Add 2 cups of water to a pot, add at least one cup of produce. You will need a separate pot or pan for each colorant.
Bring mixture to a boil and then turn heat down to a simmer for 15 minutes.
Pour through sieve into container.
Add 1 tbsp of vinegar and stir. If working with children, let cool before use.
Rub egg with a bit of vinegar with a cloth or paper towel. Place egg into container.
The longer you leave the egg in, the deeper the color. For reference, the darkest blue egg shown was left for an hour. The lightest blue egg was only dyed for around five minutes.
Take eggs out of dye (I used a spoon) and let dry for several hours or over night before handling.
I used Martha Stewart’s method of turning an egg carton upside down as an egg drying rack.

That’s it!
Here are some other suggested changes you can make that will impact the colour of the eggs.
Variances:
-the colour of the egg you use (i.e., brown eggs)
-adding 1 tbs of salt to each pot of boiling water
-add two cups of produce instead of one
-to add a bit of a shine to your finished egg, rub with a paper towel and a small bit of vegetable oil

Happy April and Easter season to you and yours!
Thank you so much for taking the time to pop by today, I hope to see you again soon. -Samantha